Designing and Deploying an OLTP Data Model with Ease
As data warehousing technologies continue to grow in demand, creating effective data models has become increasingly important. In particular, optimizing online transactional processing (OLTP) data models—which define the structural relationships between normalized tables and entities—for efficient transactional processing is crucial.
However, creating an OLTP data model presents various challenges. Firstly, OLTP systems carry large volumes of transactional data every day. This means hundreds of tables requiring regular updates. Querying the data and creating joins between numerous tables can be an overwhelming and time-consuming task.
Secondly, OLTP systems hold sensitive data, which leads to data privacy and security concerns. Finally, given the reams of data flowing in everyday, OLTP models must be scaled frequently—imagine the effort that goes into sifting through tables and writing hundreds of lines to update the model manually.
Do you want to learn how to create a secure and scalable data model in just a few simple steps? Well, there’s a hard way of designing and maintaining data models and then there is the Astera’s way. We suggest the latter! Astera data modeling—as opposed to conventional methods—allows you to create OLTP models efficiently and quickly.
Additionally, you can learn more about designing denormalized dimensional models here.
Data Modeling in a Streamlined Platform, The Astera Benefit
Astera DW Builder has a dedicated data model designer capable of designing models based on any type of on-prem or cloud database e.g., Redshift, Azure, Snowflake, etc. This solves many of the common challenges of designing an OLTP data model.
For instance, organizations often encounter the challenge of synchronizing disparate databases to create a standardized model or warehouse. That’s because each database has its own set of requirements and programing methodologies.
Astera DW Builder provides a uniform way for designing data warehouses that is compatible with all databases. This streamlines the process of creating or deploying models, making it infinitely easier compared to a traditional, manual approach.
Moreover, Astera’s data model-centric approach to data warehousing enhances database security through separate models and access controls. For example, if you have a database with critical information that cannot be shared with others in entirety, you can use the OLTP model as a separate view of the database that only includes shareable tables.
Access to the model can then be restricted to authorized individuals. By acting as an abstraction layer, the model can be modified for data warehousing without affecting the database itself.
Moreover, Astera’s data models are designed and deployed in an automated, code-free environment. These models create automatic joins between relevant tables while eliminating the need for writing code. The automated, zero-code environment, coupled with a visual representation of entities, makes it significantly easier for you to update or scale the model.
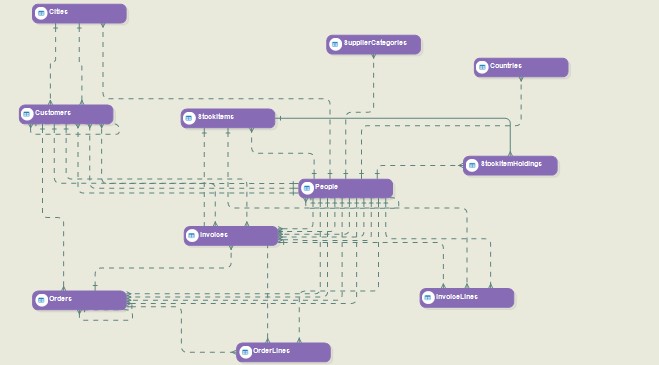
OLTP Data Model Visualization
Design, Deployment, and Consumption of an OLTP Data Model
Step 1: Identifying and Modeling the Data
The first step is to select the database of interest from the ‘Change Database Connection Info’ button on the tool bar.
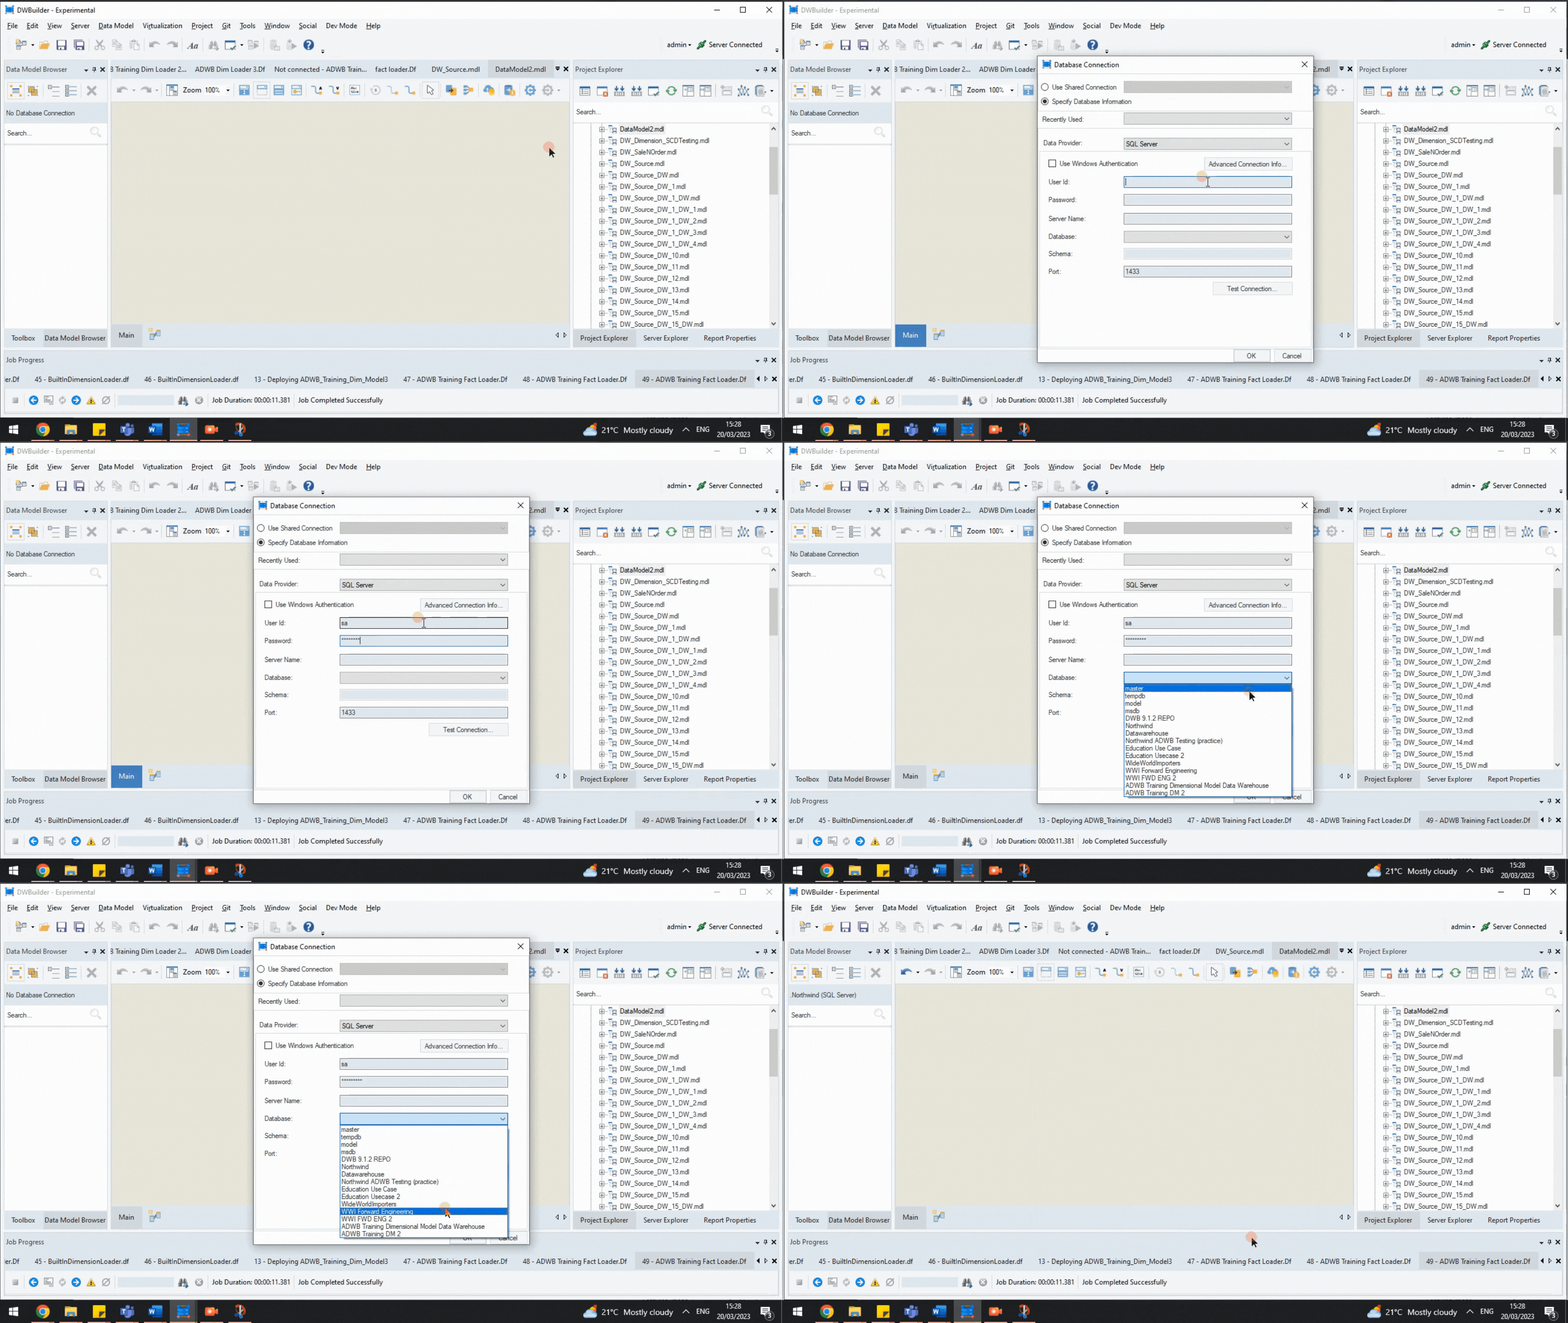
For this use case, we select the fictitious Northwind database from the SQL server.
Next, we reverse engineer the database and choose the tables we want to model with Astera DW Builder. But what is reverse engineering?
Here, reverse engineering refers to the process of creating a data model from an already existing database. The tool enables users to reverse engineer an existing database and reveal the selected tables and their relationships—with key constraints—on a logical level.
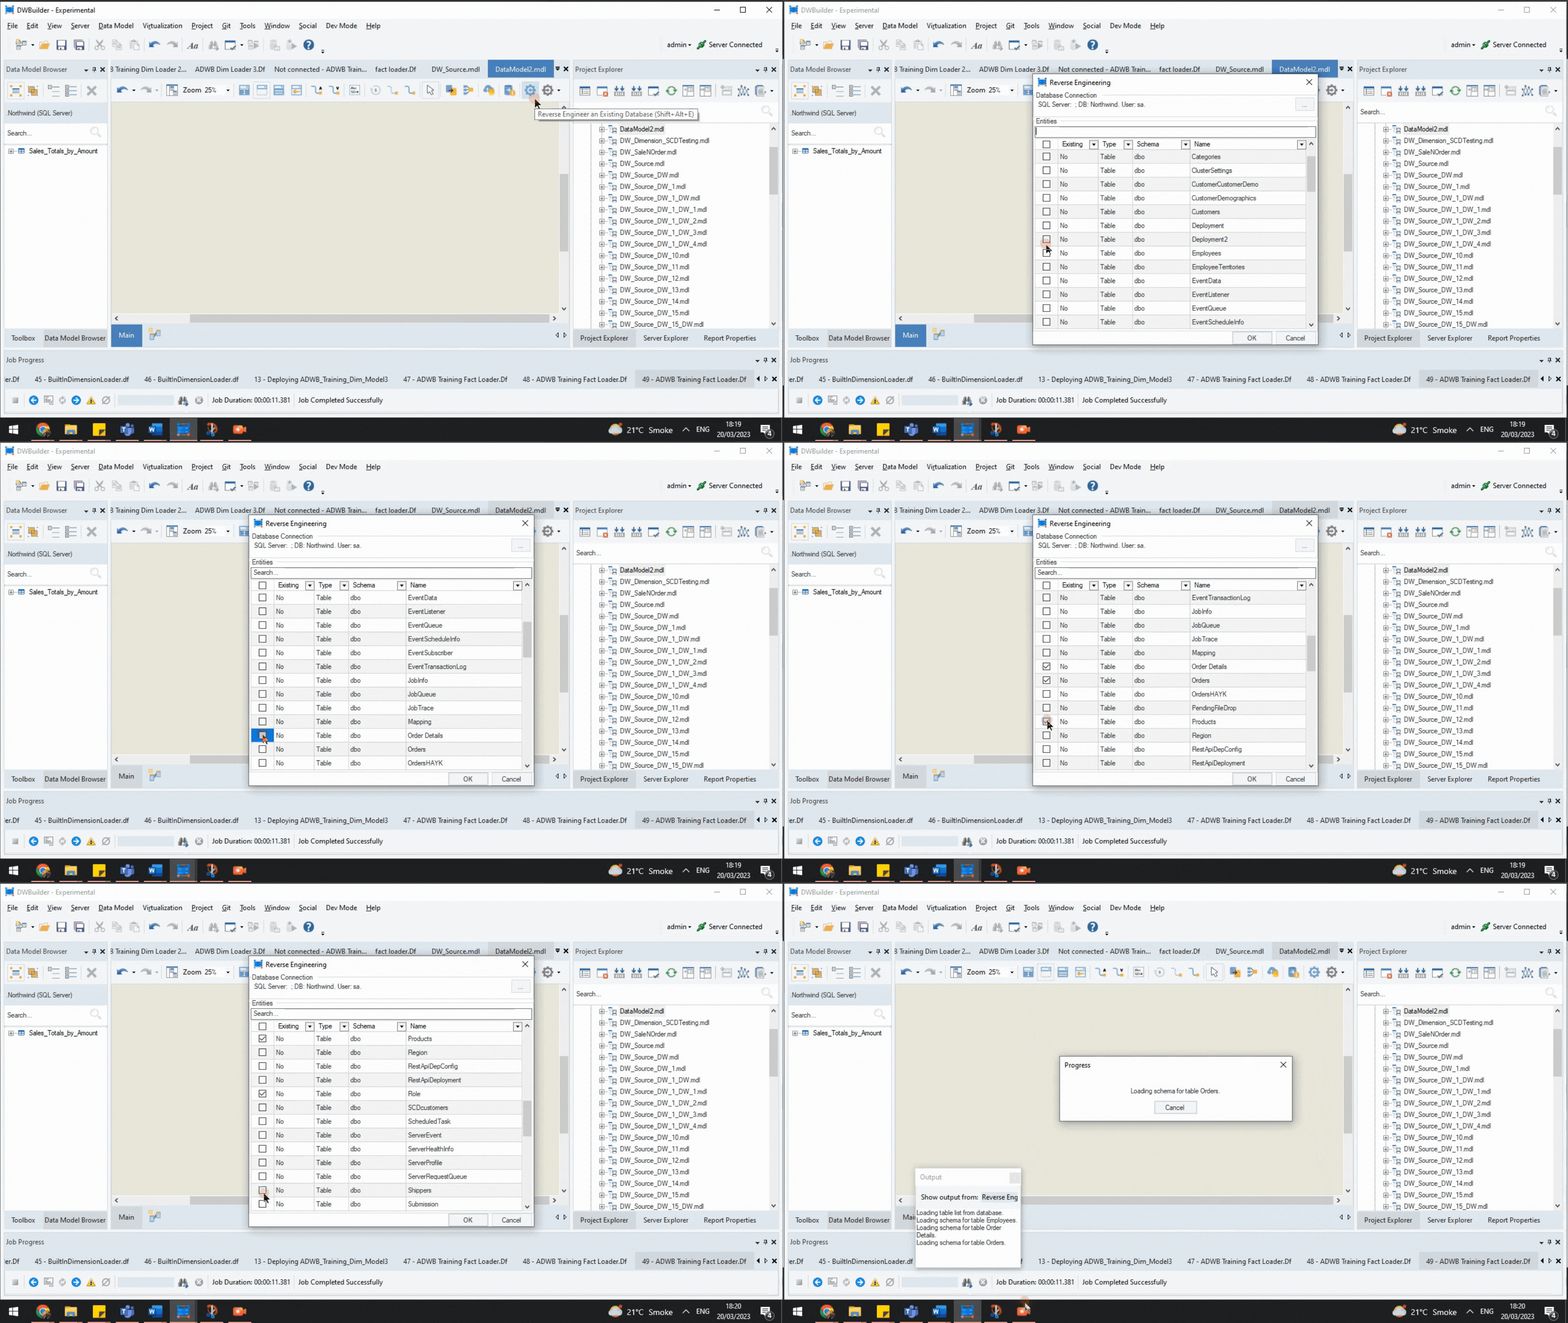
Reverse Engineering a Database.
Here’s our sample reverse-engineered data model.
We reverse-engineered the following tables for our data model:
- Orders
- Products
- Order Details
- Customers
- Employees.
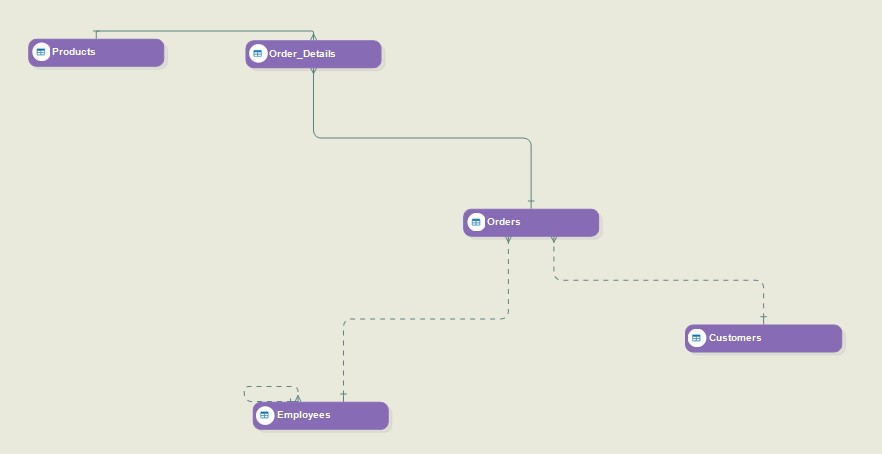
Reverse Engineered Model
The straight lines between different tables reveal the relationships between these entities due to their primary and foreign keys. Moreover, the layout builder for each table shows editable information for all the fields in the table.
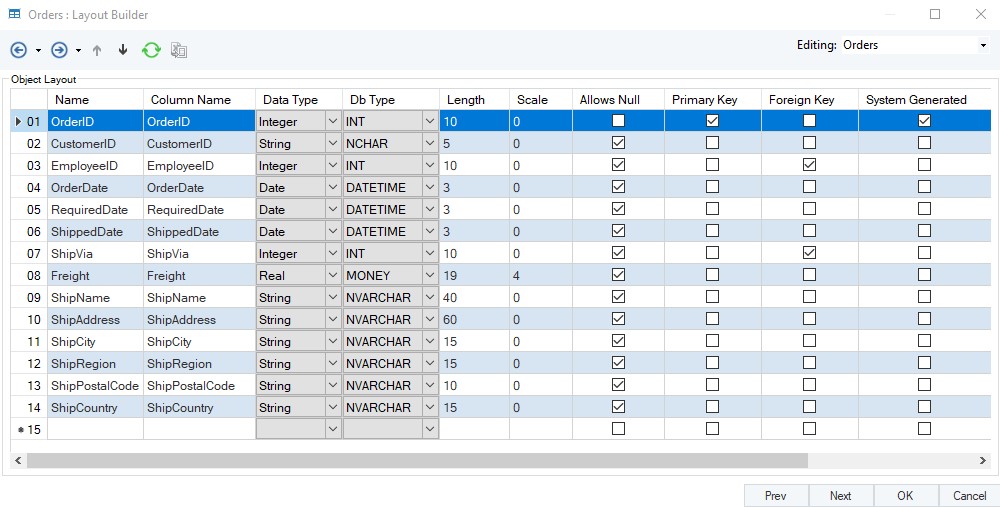
Layout Builder for Orders
Step 2: Data Model Verification
We will deploy our source model for consumption in ETL pipelines. However, before deployment, we must verify it for any deployment-related errors or warnings.
To do this, we select Verify for Read and Write Deployment, the default option for the Start Verification button.
When we select this option, the Verify window will indicate whether the model is ready for deployment or if it contains errors that must be solved before the deployment.

Verification of the data model
For example, here’s an error we encounter while verifying our model.

This verification error shows that the model’s OrderID field is inconsistent with the database’s OrderID since it’s not marked as a system-generated key. We simply mark it correctly in the layout builder and move towards deployment after eliminating the errors.
Step 3: Deployment of the OLTP Model
Finally, we deploy the data model on our server using the ‘Deploy Data Model’ button in the toolbar.
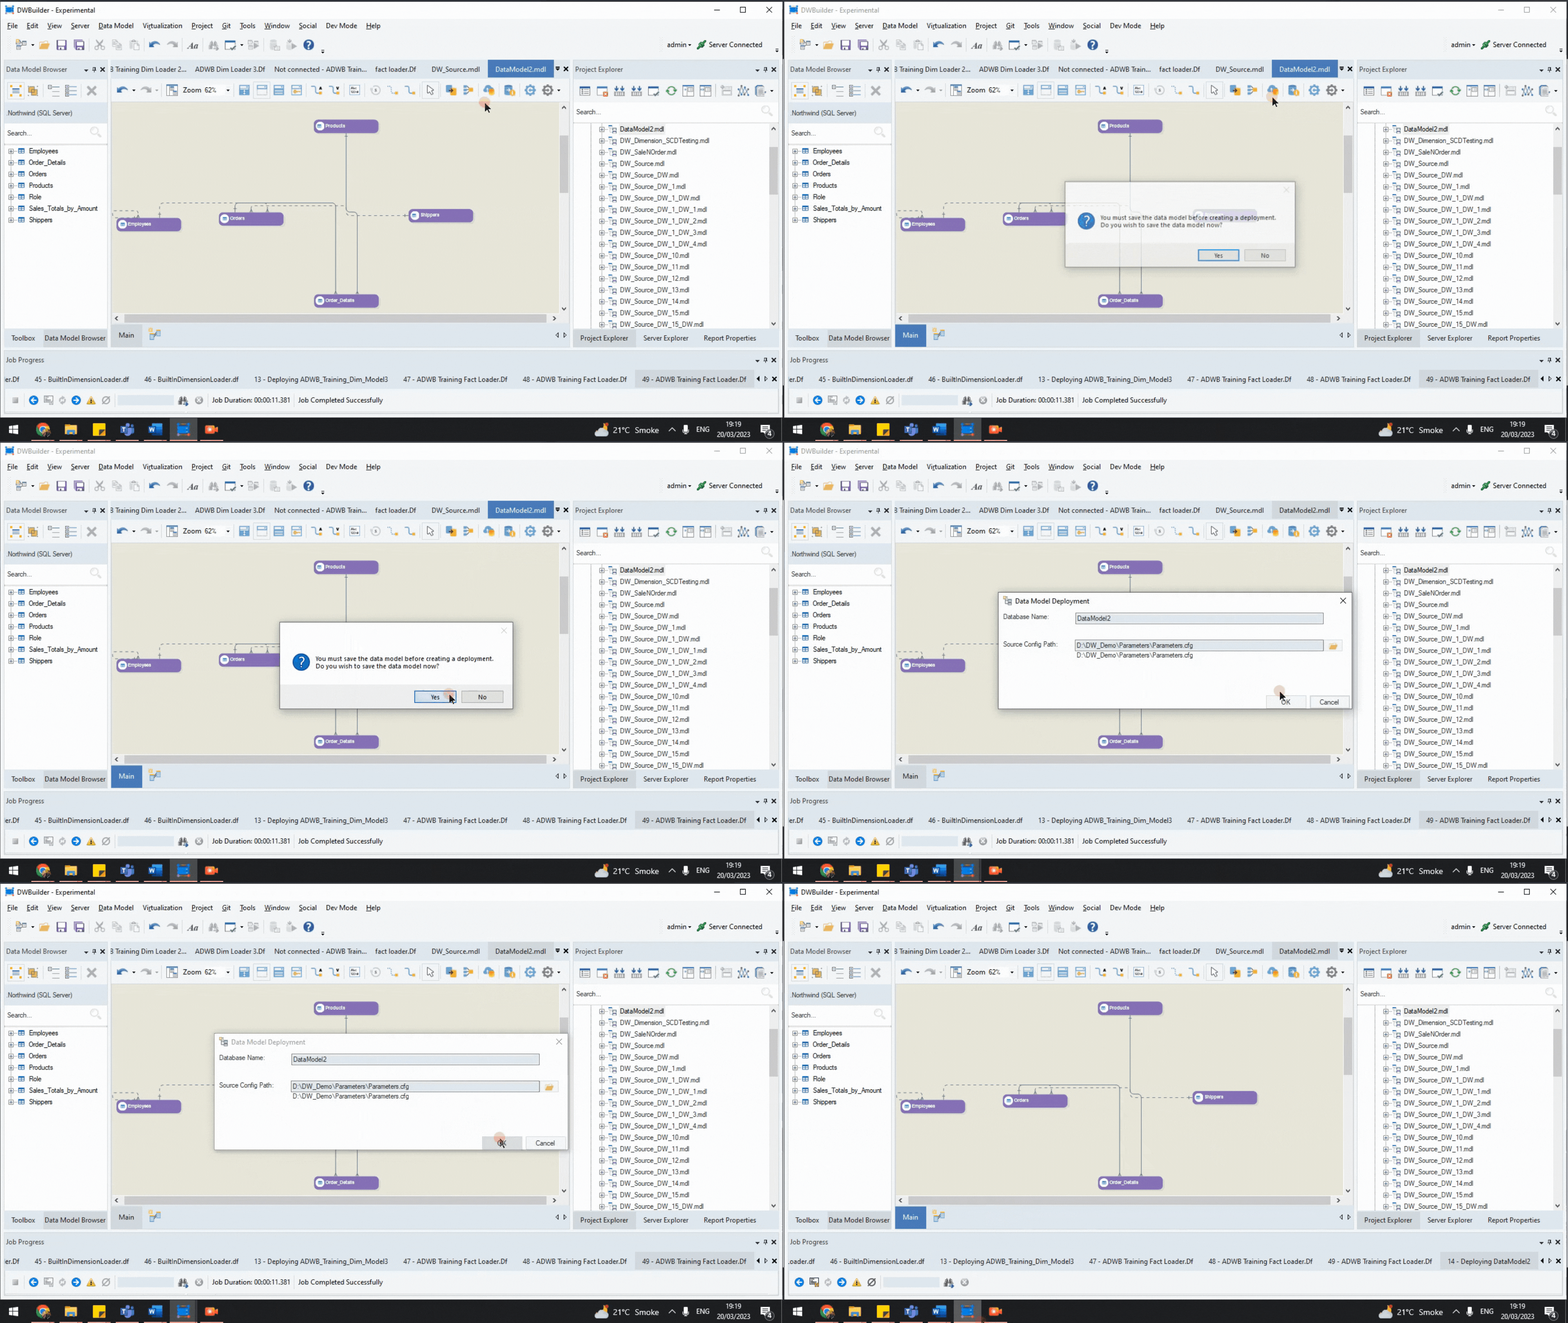
Data Model Deployment
This deployed model exists on our server as an Astera Data Model (ADM) and can easily be consumed in ETL pipelines.
Consuming the ADM (Astera Data Model) Deployment
- The ADM deployment is a logical view of the actual source that acts as an abstraction layer for added security.
- ADM uses the metadata to automatically create hierarchical child-parent joins through the Data Model Query object. We can automatically extract data from multiple tables in the source without writing scripts for creating individual joins.
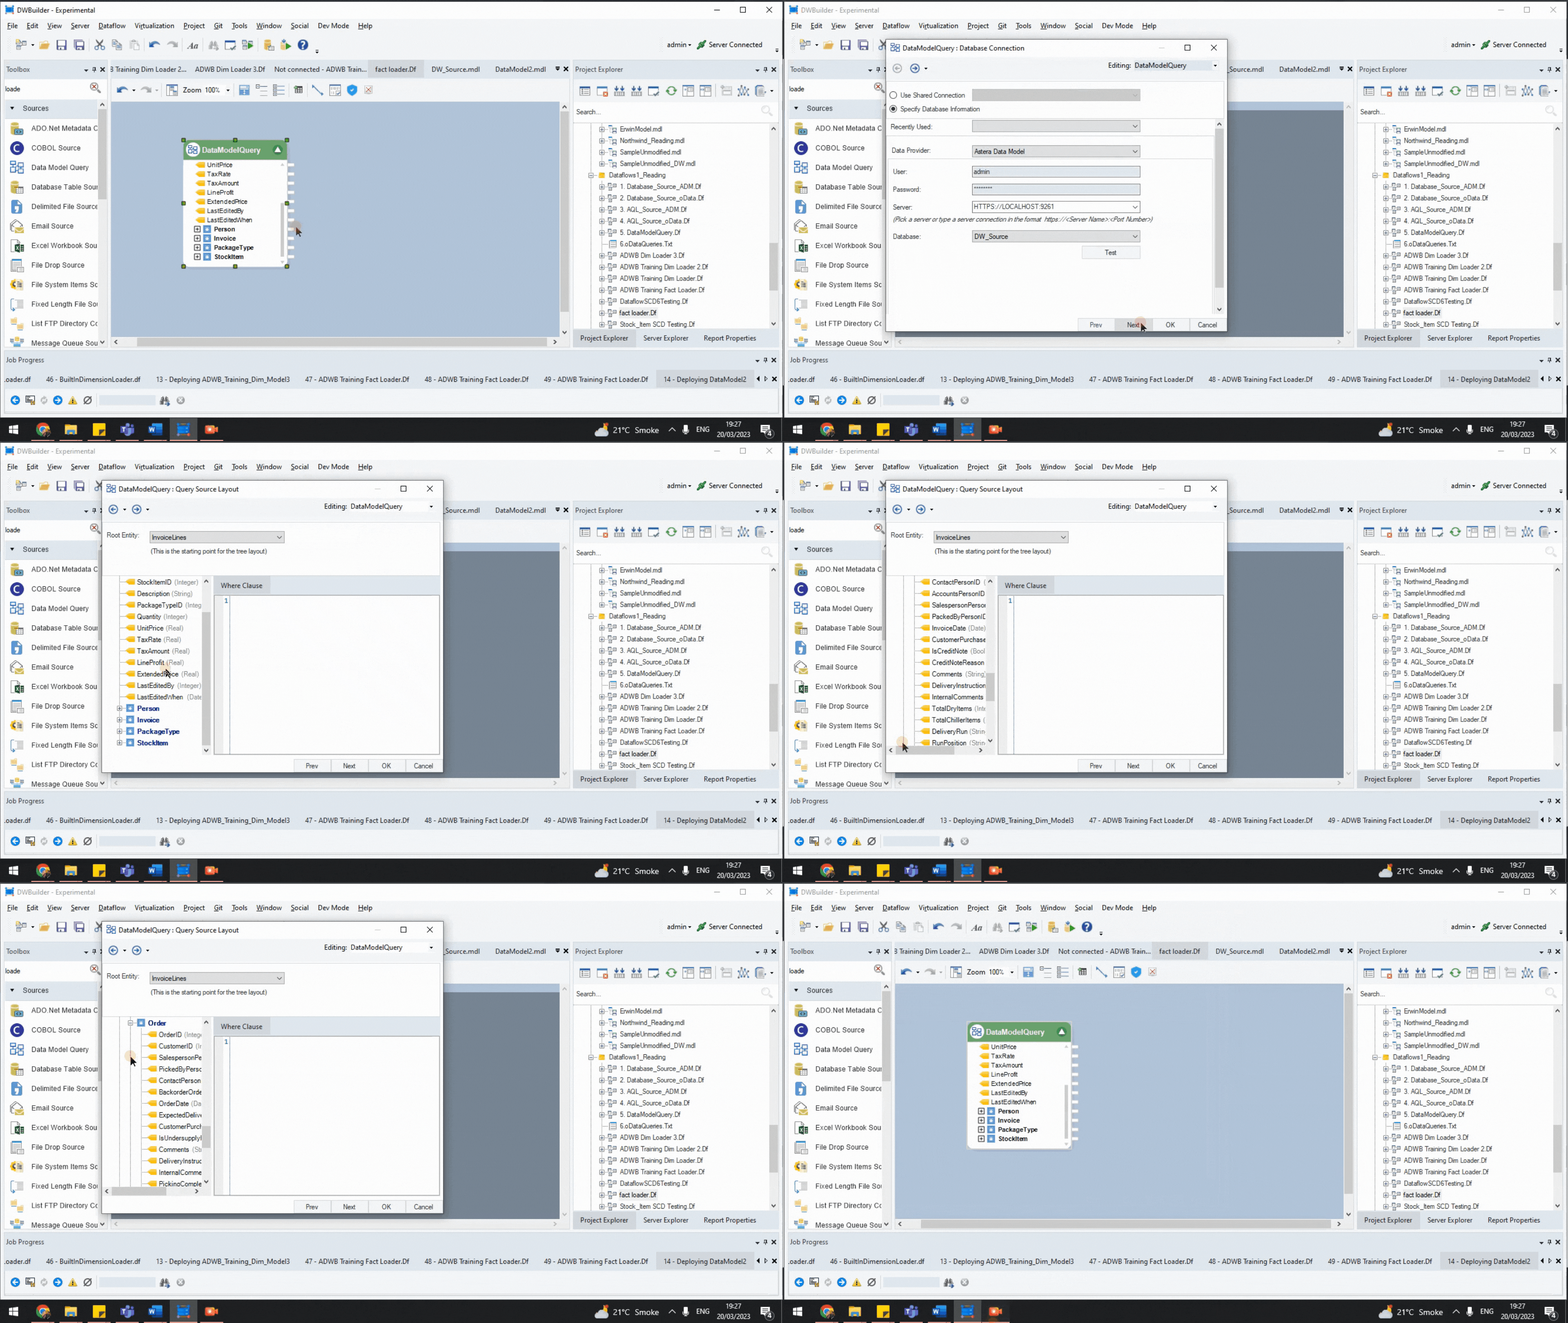
Data Model Query
The OLTP model and its joins are useful for populating destination data warehouses and utilizing models in business intelligence. Additionally, the deployed model can be accessed through external visualization tools like PowerBI and Tableau via the built-in OData Module.
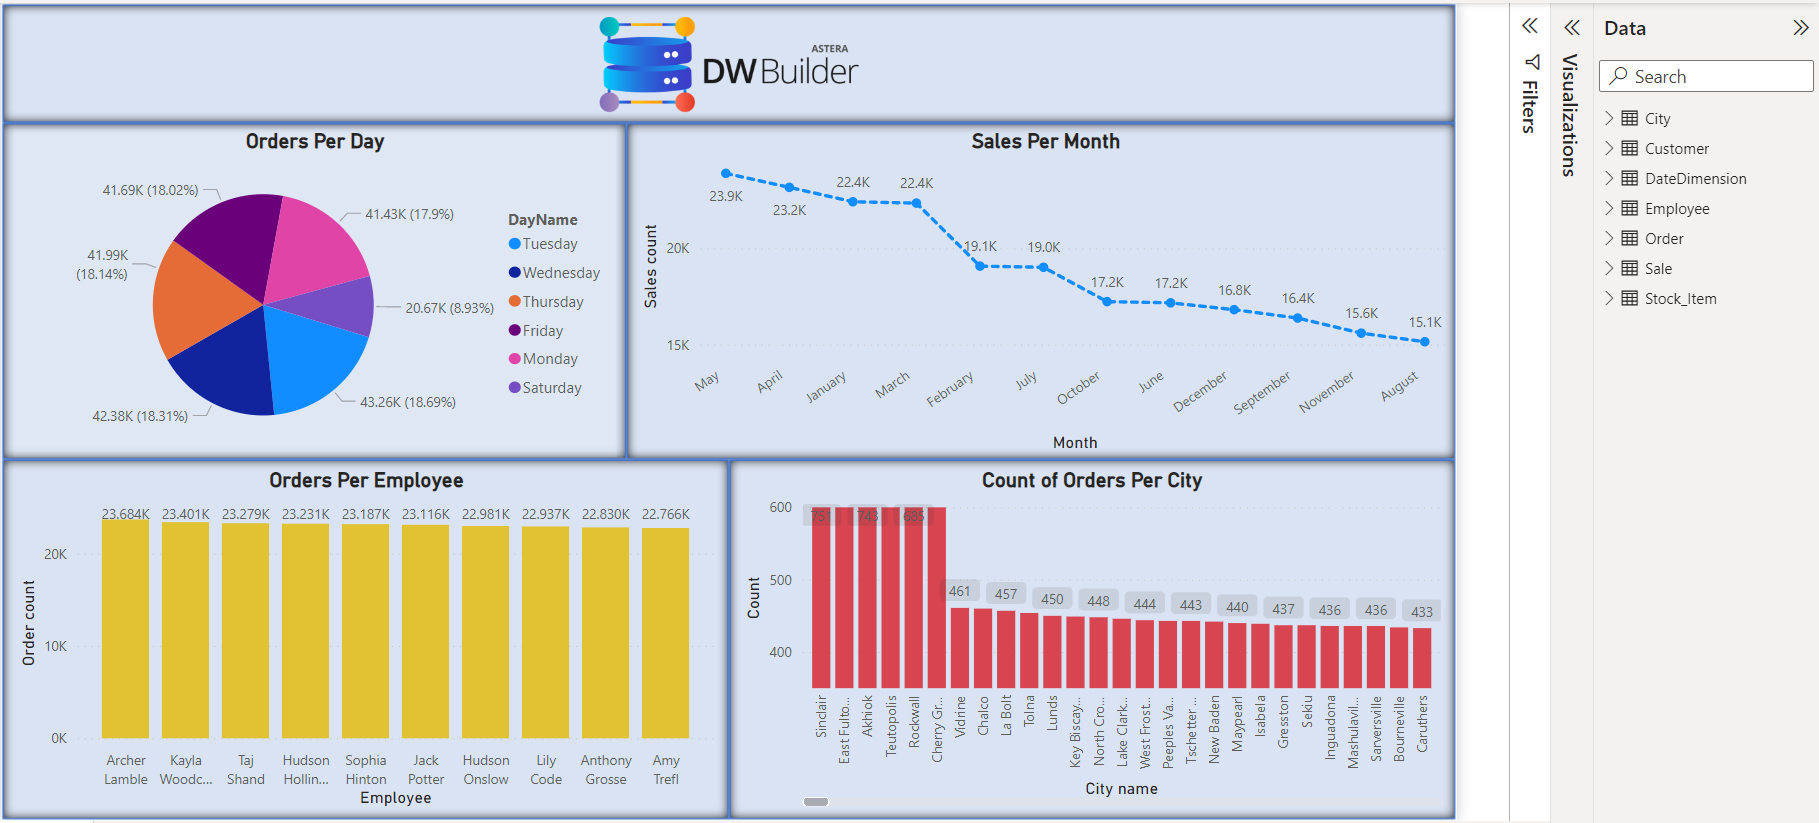
A PowerBI report based on an Astera Data Model deployment
Data Modeling, the Astera Way!
As seen above, Astera’s data models improve database security, model scalability, and eventual data model consumption in ETL pipelines or BI tools. And the stated approach to designing and deploying OLTP models is the easiest as it gets!
Check out this guide to learn about designing automated dimensional models with Astera DW Builder.
Our zero-code data warehouse automation tool streamlines the entire process of creating, verifying, and deploying a secure data model. Using Astera DW Builder; you can cut down the data warehouse design and development lifecycle by up to 80%.
 Astera AI Agent Builder - First Look Coming Soon!
